Does anyone remember the commercial for Rice Crispy Treats when the woman would throw flour on her face in the kitchen to make it look like she worked so hard to make them and then tell her family "Go ahead......eat them. I'll make more."? That's pretty much how I feel about these bags.
The finished bag looks like it was difficult to make, but really it's super easy!
A few of my girlfriends who are learning to sew are a bit intimidated by zippers.
One dear friend of mine actually used crazy glue to attach a zipper.
(Don't worry...your secret is safe with me!:)
Well here is a project that makes sewing in a zipper Easy Peasy!
By using a zipper that is larger than the bag itself, it makes this bag totally stress free
and there is no wrestling with the zipper.
This is such a breeze to do, you can even change the dimensions for any size bag, larger or smaller.
The finished size of this bag is 7 1/2" by 4 1/2".
So are you ready to make a cute bag?
 |
For this size bag you will need a zipper that is at least 12" long.
Cut 1 each of your main fabric, your lining fabric and fusible fleece into 8 1/2" by 11" rectangles. If you are using an obvious directional fabric like these owls, make sure to cut your fabric accordingly. |
 |
| Next, iron your fusible fleece to the wrong side of your lining fabric. |
 |
| Layer your fabrics and make a cut at 4 1/2" from the bottom. You will have (2) pieces 4 1/2" by 8 1/2" and (2) pieces 6 1/2" by 8 1/2". |
 |
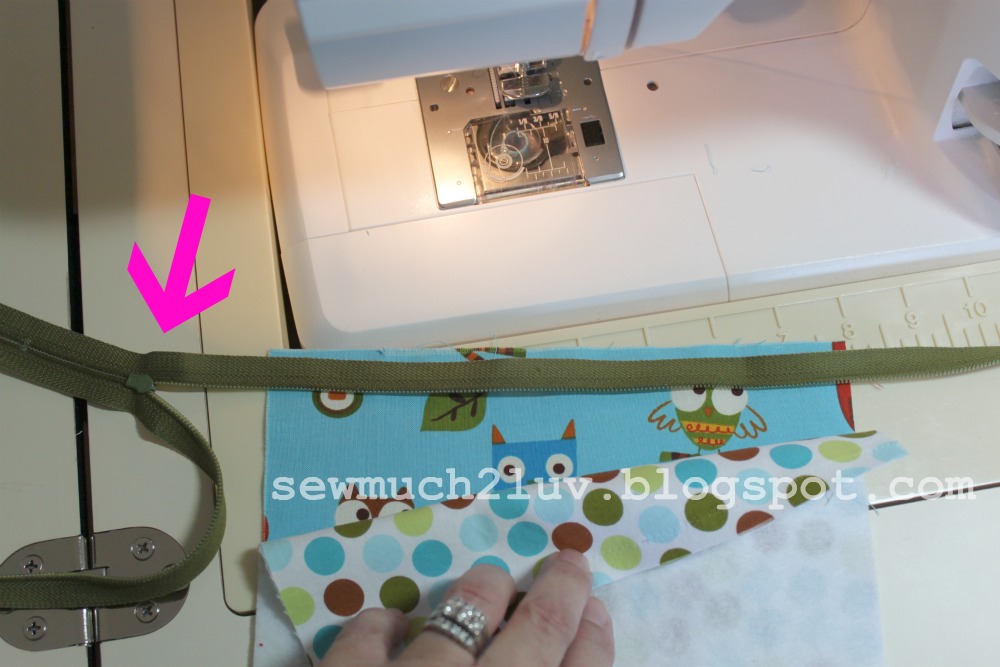
| You can see by the photo that I am using a zipper that is quite a bit larger than the 8 1/2" fabric pieces. You can use any size you have laying around as long as it's larger that the bag you are making. Open your zipper and make sure it is face down on top of the 6 1/2" main fabric with the zipper pull to the left. |
 |
| Attach your zipper foot to your sewing machine. Sandwich the zipper between the main fabric and the lining fabric, right sides together. You can certainly use pins here to keep your pieces in place. |
 |
| Using a pen or marker, make a mark where the fabric ends on both halves of the zipper. This will be a reference point. |
 |
| Line up your 4 1/2" main fabric at the mark your made on the zipper so that both sides will line up and sandwich that side of the zipper the same way that you did the other with main fabric and lining fabric having right sides together. |
 |
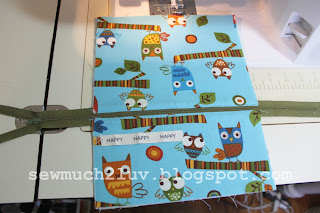
| This is what it should look like. Double check that you have the zipper face down at this point. ( Just the other day I ended up having to use the trusty seam ripper to re-do a bag because the zipper was wrong side up. ) |
 |
| Flip both pieces around so that wrong sides are together now and press from both sides being careful not to iron the zipper itself. You are trying to make sure that the fabric is away from the zipper teeth. |
 |
| Still using your zipper foot, top stitch close to the edge of the fabric to insure that it won't get caught in the zipper when you open and close the bag later. |
 |
| This is the time you would add any ribbons, ruffles, or appliques to the bottom section of the bag. Because this fabric has so much going on I chose not to add anything to distract from the owlies. |
 |
| Open the zipper at least 1/2 way or more to enable you to flip the bag right side out after you sew the edges together. With the main fabric (right sides facing) pin the bag. |
 |
| Using a 1/2" seam allowance stitch the 3 sides together making sure to stitch slowly through the zipper, using the forward and reverse stitching for re-enforcement. Don't be afraid to sew through the zipper. Just go slowly and it works great. |
 |
| Now you are ready to cut off the extra length of the zipper on both sides of the bag. |
 |
| Trim your seam allowances and zig zag or overlock all 3 edges. |
 |
Turn the bag right side out and carefully push out the corners. Sit back and admire your work!
Easy right? So go ahead, give one to a friend.....you can make more :) |


1 comments:
You are right! This looks like the easiest way to put in a zipper that I've see yet!! Thanks!
Post a Comment
Thank you so much for stopping by! Your sweet comments really make my day!